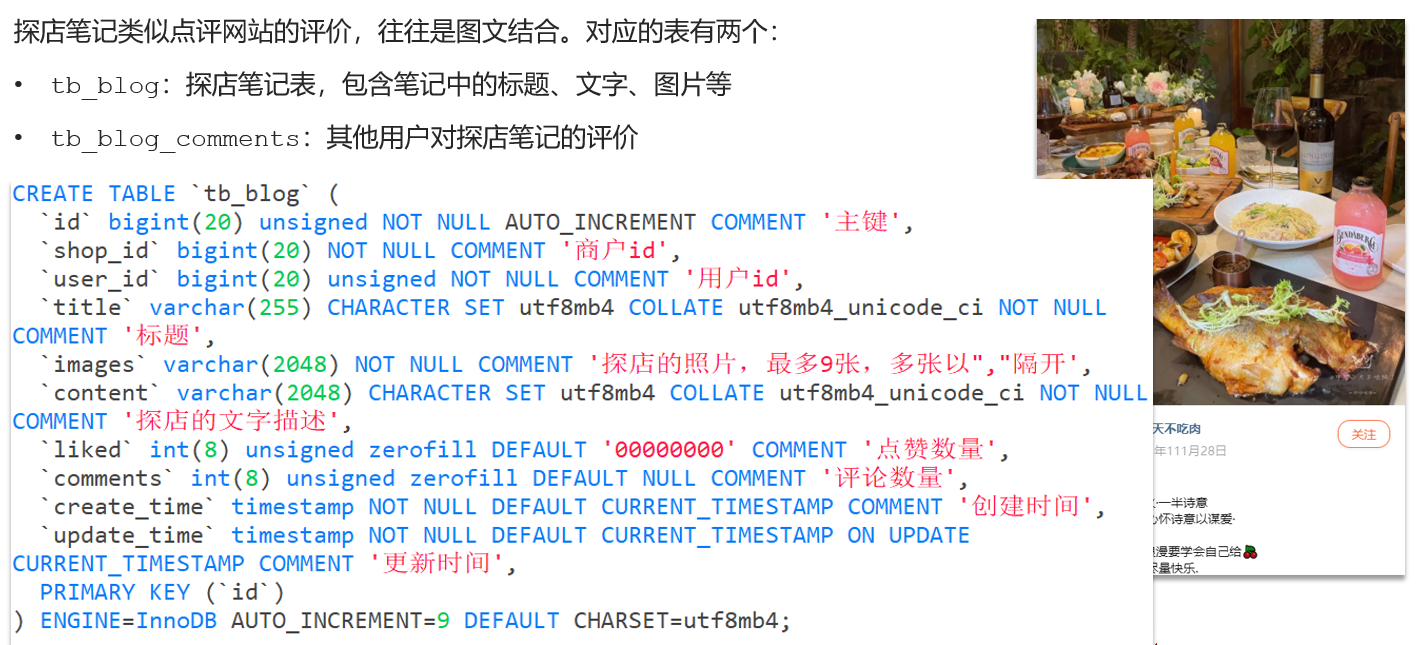
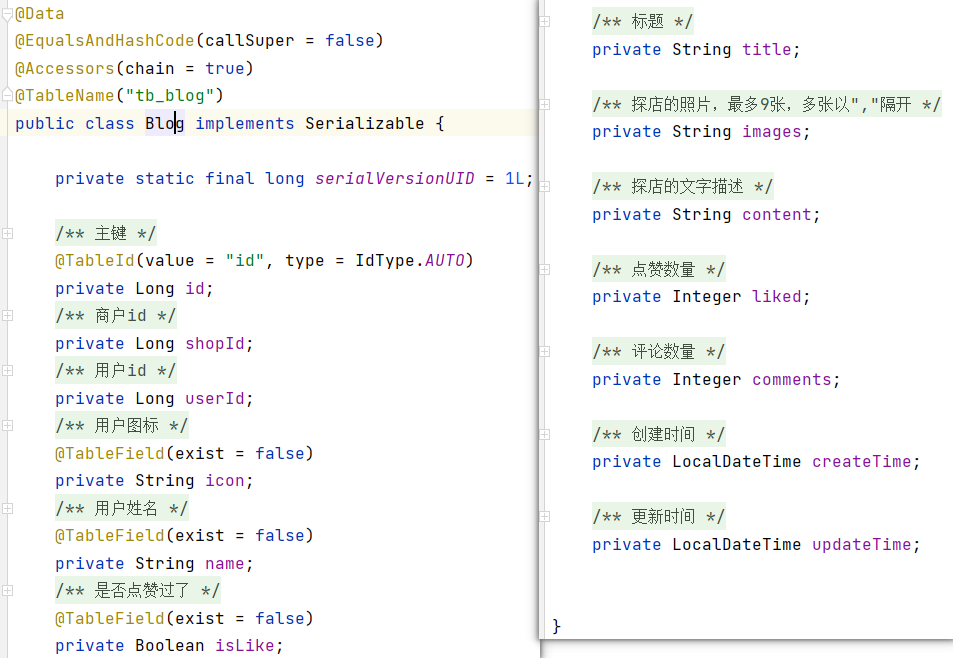
8. 达人探店 8.1 发布探店笔记
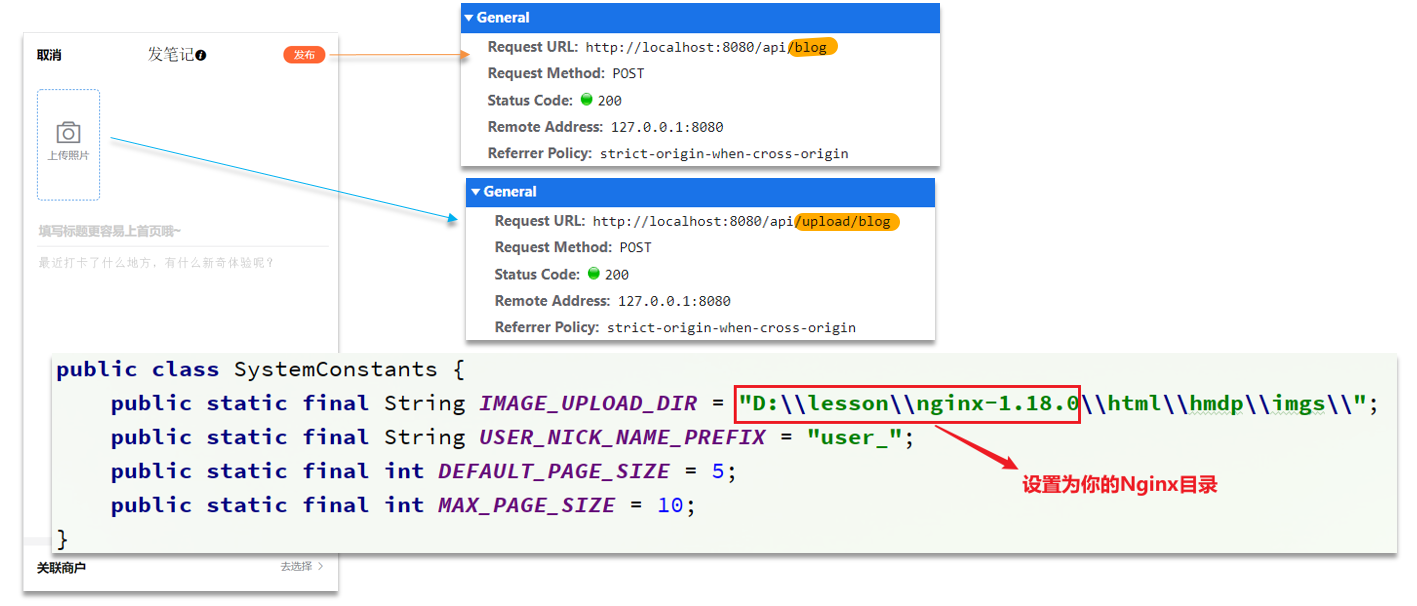
上传接口
1
2
3
4
5
6
7
8
9
10
11
12
13
14
15
16
17
18
19
20
21
22
@Slf4j @RestController @RequestMapping("upload") public class UploadController {@PostMapping("blog") public Result uploadImage (@RequestParam("file") MultipartFile image) {try {String originalFilename = image.getOriginalFilename();String fileName = createNewFileName(originalFilename);new File (SystemConstants.IMAGE_UPLOAD_DIR, fileName));"文件上传成功,{}" , fileName);return Result.ok(fileName);catch (IOException e) {throw new RuntimeException ("文件上传失败" , e);
注意:同学们在操作时,需要修改SystemConstants.IMAGE_UPLOAD_DIR 自己图片所在的地址,在实际开发中图片一般会放在nginx上或者是云存储上。
BlogController
1
2
3
4
5
6
7
8
9
10
11
12
13
14
15
16
17
18
@RestController @RequestMapping("/blog") public class BlogController {@Resource private IBlogService blogService;@PostMapping public Result saveBlog (@RequestBody Blog blog) {UserDTO user = UserHolder.getUser();return Result.ok(blog.getId());
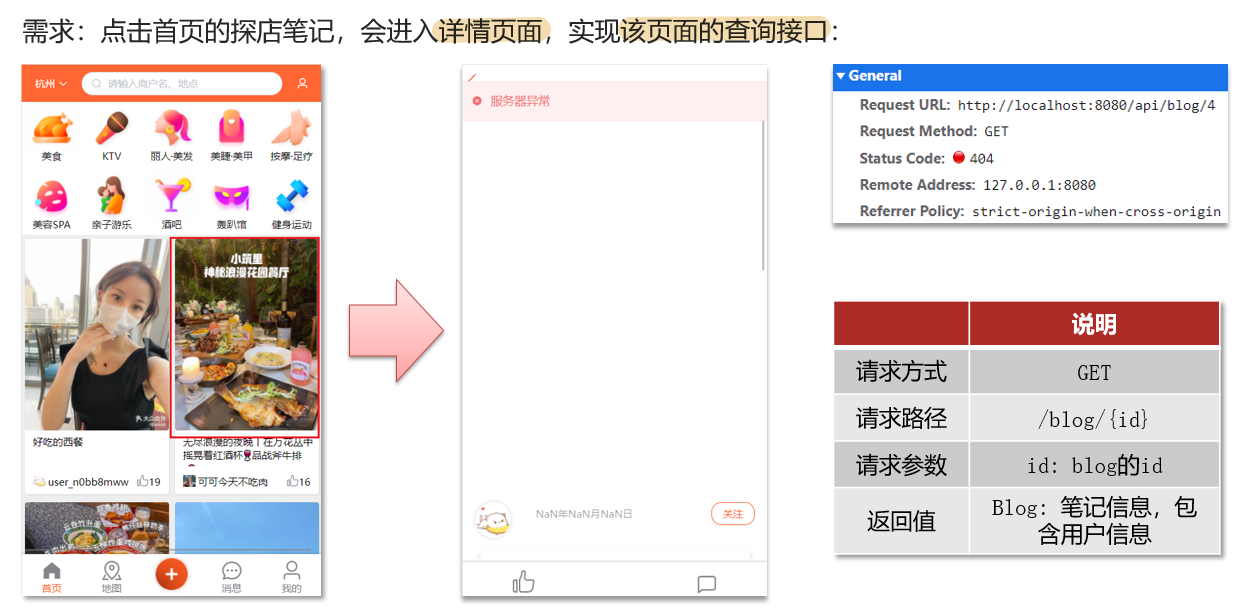
8.2 查看探店笔记
实现代码:
BlogServiceImpl
1
2
3
4
5
6
7
8
9
10
11
12
13
14
15
16
17
18
19
@Override public Result queryBlogById (Long id) {Blog blog = getById(id);if (blog == null ) {return Result.fail("笔记不存在!" );return Result.ok(blog);private void queryBlogUser (Blog blog) {Long userId = blog.getUserId();User user = userService.getById(userId);
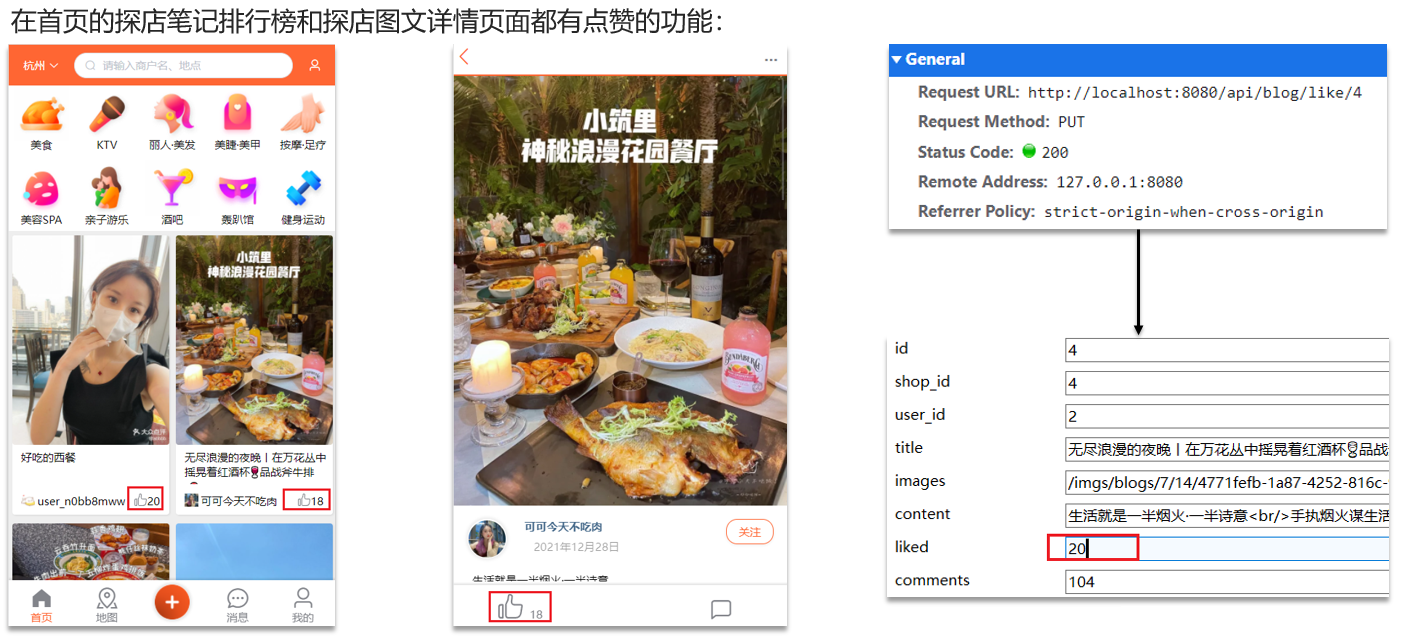
8.3 点赞功能 初始代码
BlogController
1
2
3
4
5
6
@GetMapping("/likes/{id}") public Result queryBlogLikes (@PathVariable("id") Long id) {"liked = liked +1 " ).eq("id" ,id).update();return Result.ok();
问题分析:这种方式会导致一个用户无限点赞,明显是不合理的造成这个问题的原因是,我们现在的逻辑,发起请求只是给数据库+1,所以才会出现这个问题
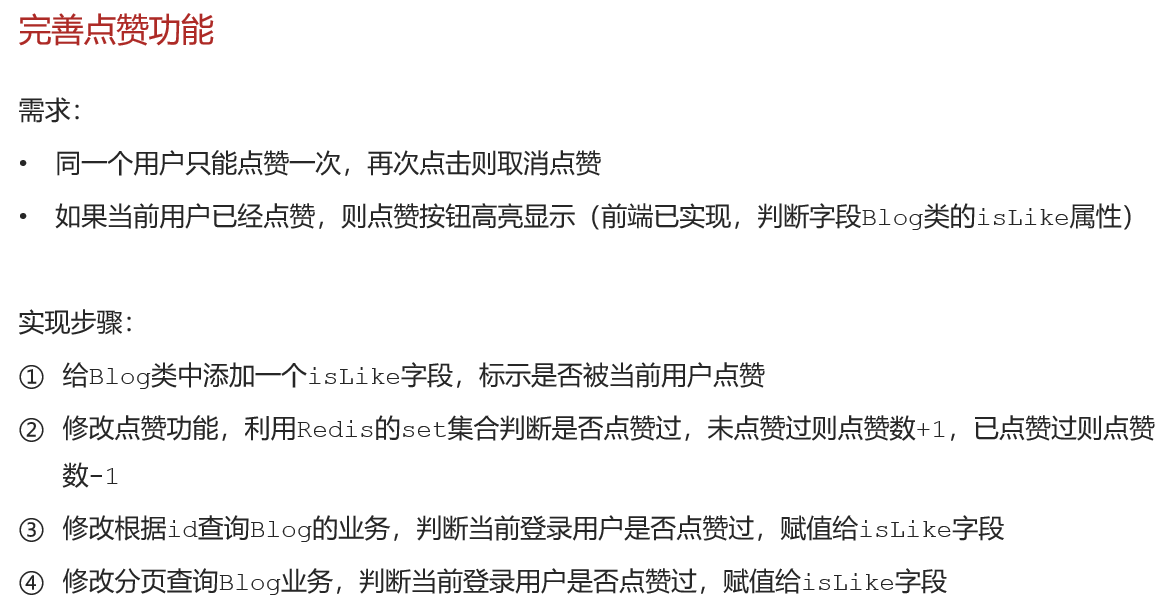
为什么采用set集合:
因为我们的数据是不能重复的,当用户操作过之后,无论他怎么操作,都是
具体步骤:
1、在Blog 添加一个字段
1
2
@TableField(exist = false) private Boolean isLike;
2、修改代码
BlogController
1
2
3
4
@PutMapping("/like/{id}") public Result likeBlog (@PathVariable("id") Long id) {return blogService.likeBlog(id);
BlogServiceImpl
1
2
3
4
5
6
7
8
9
10
11
12
13
14
15
16
17
18
19
20
21
22
23
24
25
26
27
28
29
30
31
32
33
34
35
36
37
38
39
40
41
42
43
44
45
46
47
48
49
50
51
52
53
54
55
56
57
58
@Override public Result likeBlog (Long id) {Long userId = UserHolder.getUser().getId();String key = BLOG_LIKED_KEY + id;Boolean isMember = stringRedisTemplate.opsForSet().isMember(key, userId.toString());if (BooleanUtil.isFalse(isMember)){boolean isSuccess = update().setSql("liked = liked + 1" ).eq("id" , id).update();if (isSuccess){else {boolean isSuccess = update().setSql("liked = liked - 1" ).eq("id" , id).update();if (isSuccess){return Result.ok();@Override public Result queryBlogById (Long id) {Blog blog = getById(id);if (blog == null ) {return Result.fail("笔记不存在!" );return Result.ok(blog);private void isBlogLiked (Blog blog) {UserDTO user = UserHolder.getUser();if (user == null ) {return ;Long userId = user.getId();String key = "blog:liked:" + blog.getId();Double score = stringRedisTemplate.opsForZSet().score(key, userId.toString());null );
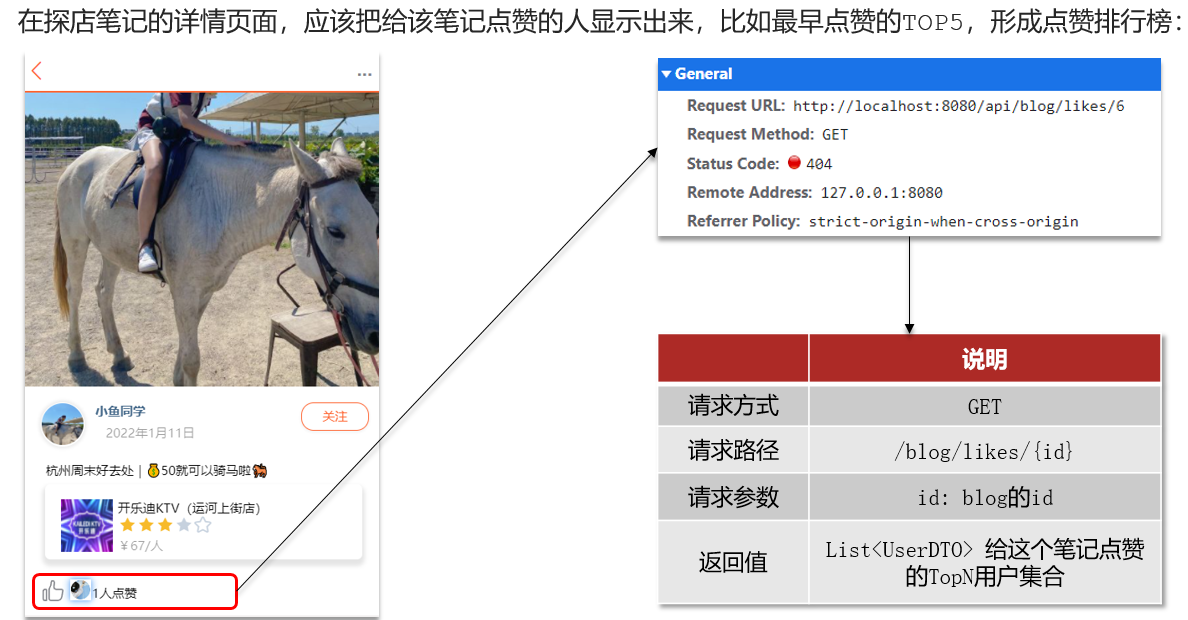
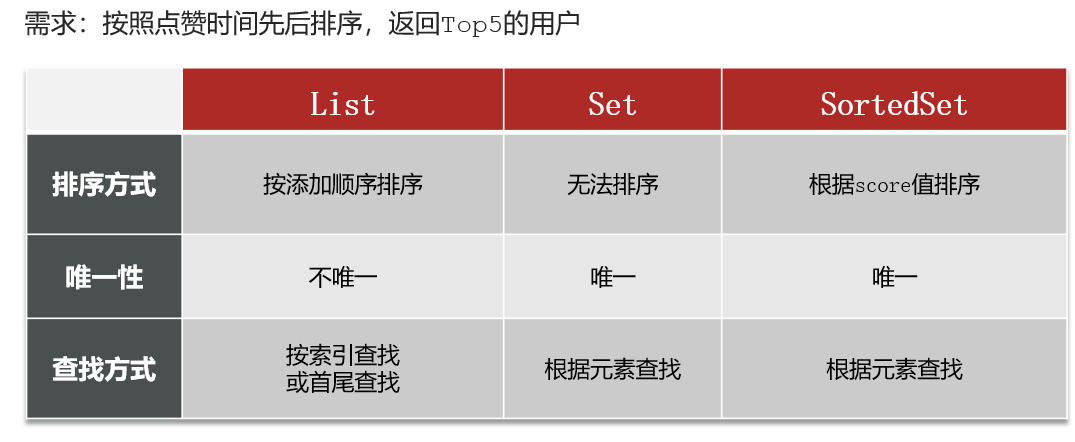
8.4 点赞排行榜
之前的点赞是放到set集合,但是set集合是不能排序的,所以这个时候,咱们可以采用一个可以排序的set集合,就是咱们的sortedSet
修改代码
BlogServiceImpl
点赞逻辑代码
1
2
3
4
5
6
7
8
9
10
11
12
13
14
15
16
17
18
19
20
21
22
23
24
25
26
27
28
29
30
31
32
33
34
35
36
37
38
39
40
41
42
43
44
45
46
@Override public Result likeBlog (Long id) {Long userId = UserHolder.getUser().getId();String key = BLOG_LIKED_KEY + id; Double score = stringRedisTemplate.opsForZSet()if (score == null ) {boolean isSuccess = update().setSql("liked = liked + 1" )"id" , id).update();if (isSuccess) { else {boolean isSuccess = update().setSql("liked = liked - 1" )"id" , id).update();if (isSuccess) {return Result.ok();private void isBlogLiked (Blog blog) {UserDTO user = UserHolder.getUser();if (user == null ) {return ;Long userId = user.getId();String key = "blog:liked:" + blog.getId(); Double score = stringRedisTemplate.opsForZSet()null );
点赞列表查询列表
BlogController
1
2
3
4
@GetMapping("/likes/{id}") public Result queryBlogLikes (@PathVariable("id") Long id) {return blogService.queryBlogLikes(id);
BlogService
1
2
3
4
5
6
7
8
9
10
11
12
13
14
15
16
17
18
19
20
21
22
23
@Override public Result queryBlogLikes (Long id) {String key = BLOG_LIKED_KEY + id;0 , 4 );if (top5 == null || top5.isEmpty()) {return Result.ok(Collections.emptyList());String idStr = StrUtil.join("," , ids);"id" , ids).last(" ORDER BY FIELD( id, " + idStr + " ) " ).list()return Result.ok(userDTOS);
9. 好友关注 9.1 关注和取消关注
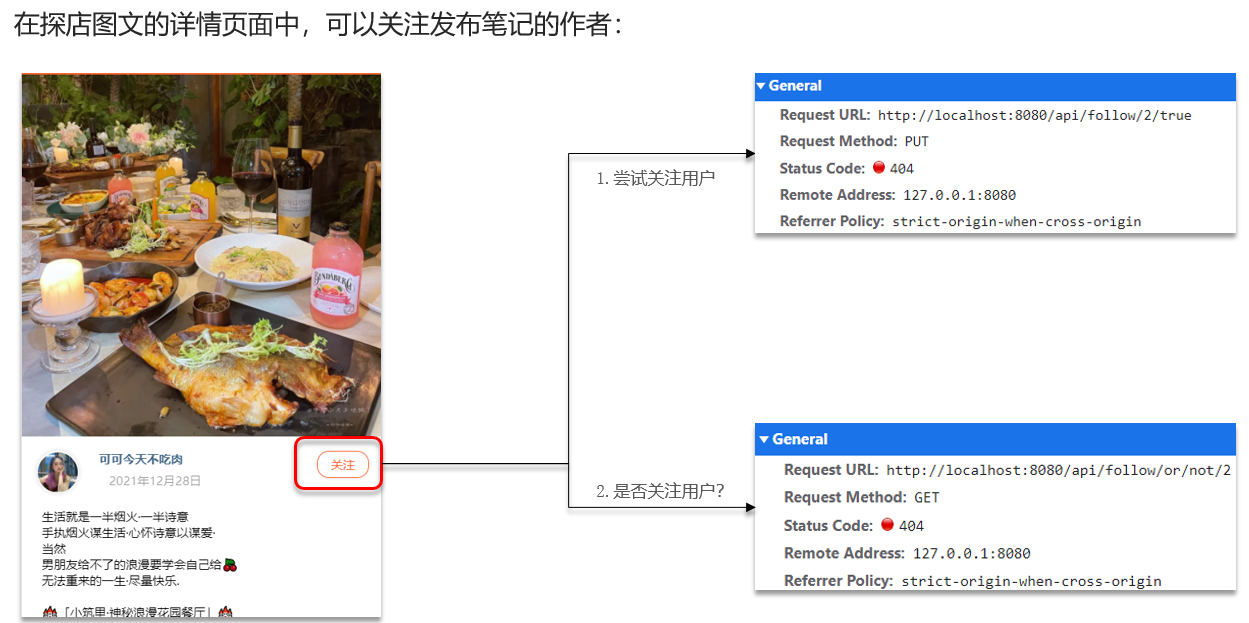
FollowController
1 2 3 4 5 6 7 8 9 10 11 12 13 @PutMapping("/{id}/{isFollow}") public Result follow ( @PathVariable("id") Long followUserId, @PathVariable("isFollow") Boolean isFollow ) {return followService.follow(followUserId, isFollow);@GetMapping("/or/not/{id}") public Result isFollow (@PathVariable("id") Long followUserId) {return followService.isFollow(followUserId);
FollowService
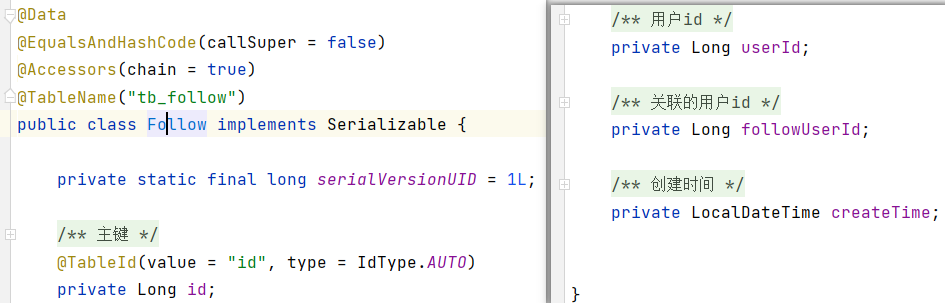
1 2 3 4 5 6 7 8 9 10 11 12 13 14 15 16 17 18 19 20 21 22 23 24 25 26 27 28 29 30 31 32 33 34 35 @Override public Result isFollow (Long followUserId) {Long userId = UserHolder.getUser().getId();Integer count = query().eq("user_id" , userId)"follow_user_id" , followUserId).count();return Result.ok(count > 0 );@Override public Result follow (Long followUserId, Boolean isFollow) {Long userId = UserHolder.getUser().getId();String key = "follows:" + userId;if (isFollow) {Follow follow = new Follow ();boolean isSuccess = save(follow);else {new QueryWrapper <Follow>()"user_id" , userId).eq("follow_user_id" , followUserId));return Result.ok();
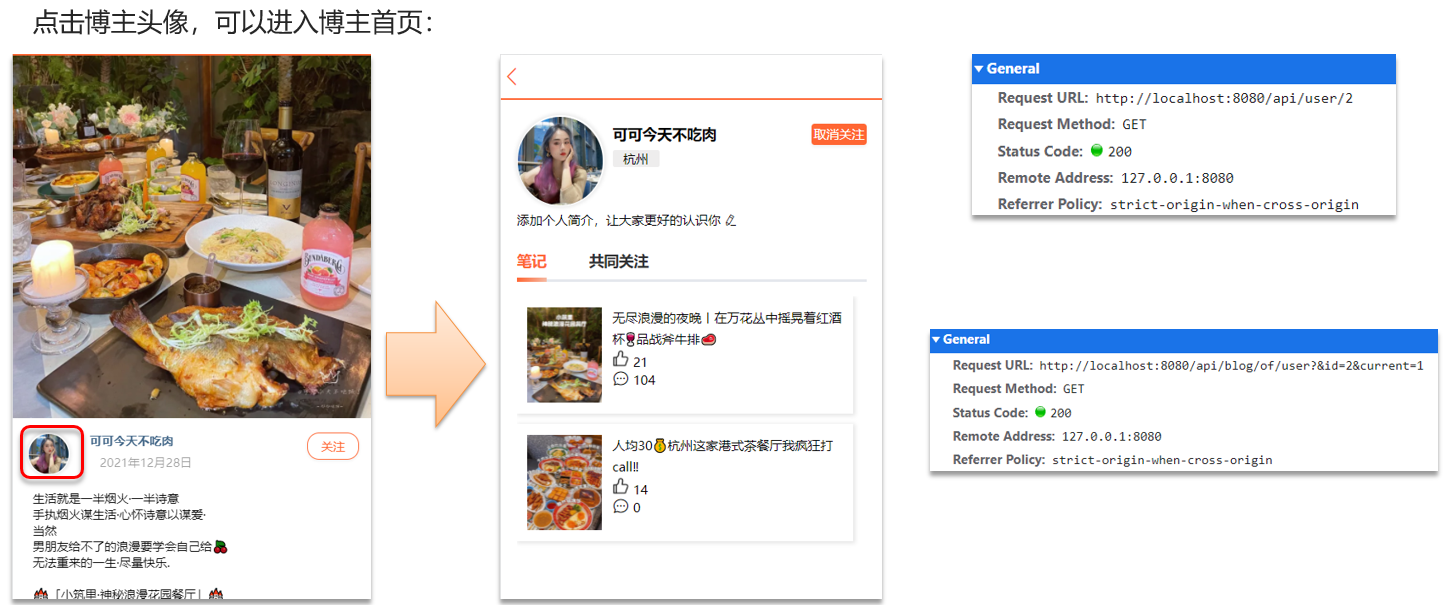
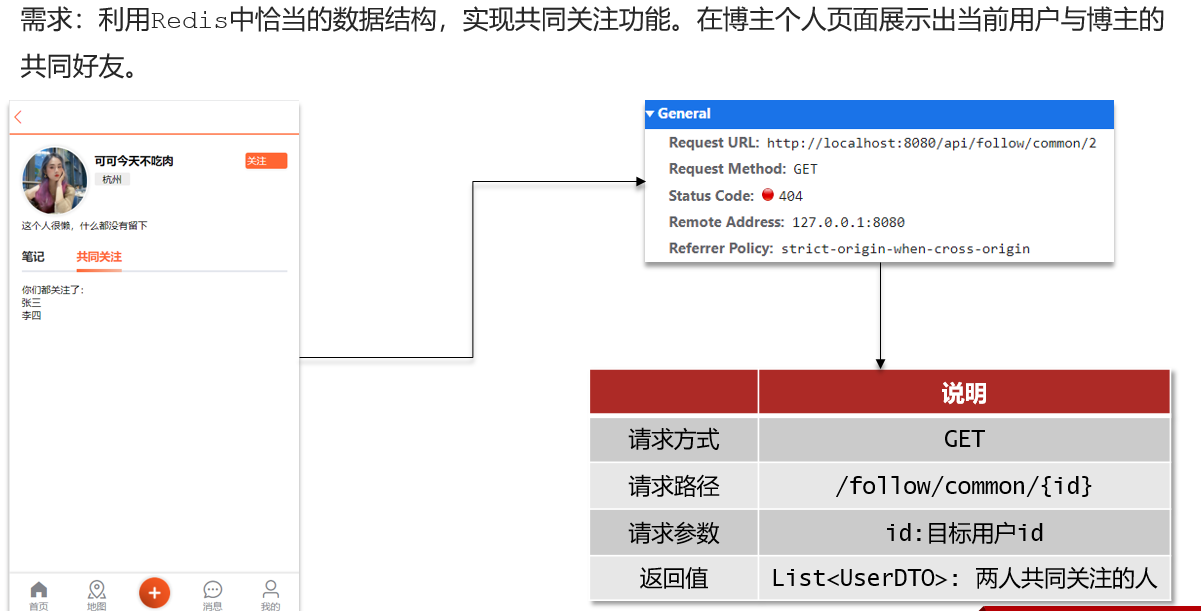
9.2 共同关注 想要去看共同关注的好友,需要首先进入到这个页面,这个页面会发起两个请求:
1、去查询用户的详情;2、去查询用户的笔记
以上两个功能和共同关注没有什么关系,大家可以自行将笔记中的代码拷贝到idea中就可以实现这两个功能了,我们的重点在于共同关注功能。
接下来我们来看看共同关注如何实现:
当然是使用我们之前学习过的set集合咯,在set集合中,有交集并集补集的api,我们可以把两人的关注的人分别放入到一个set集合中,然后再通过api去查看这两个set集合中的交集数据。
我们先来改造当前的关注列表,改造原因是因为我们需要在用户关注了某位用户后,需要将数据放入到set集合中,方便后续进行共同关注,同时当取消关注时,也需要从set集合中进行删除。
FollowServiceImp
1
2
3
4
5
6
7
8
9
10
11
12
13
14
15
16
17
18
19
20
21
22
23
24
25
26
27
@Override public Result follow (Long followUserId, Boolean isFollow) {Long userId = UserHolder.getUser().getId();String key = "follows:" + userId;if (isFollow) {Follow follow = new Follow ();boolean isSuccess = save(follow);if (isSuccess) {else {boolean isSuccess = remove(new QueryWrapper <Follow>()"user_id" , userId).eq("follow_user_id" , followUserId));if (isSuccess) {return Result.ok();
具体的关注代码:
FollowController
1
2
3
4
@GetMapping("/common/{id}") public Result followCommons (@PathVariable("id") Long id) {return followService.followCommons(id);
FollowServiceImpl
1
2
3
4
5
6
7
8
9
10
11
12
13
14
15
16
17
18
19
20
21
@Override public Result followCommons (Long id) {Long userId = UserHolder.getUser().getId();String key = "follows:" + userId;String key2 = "follows:" + id; if (intersect == null || intersect.isEmpty()) {return Result.ok(Collections.emptyList());return Result.ok(users);
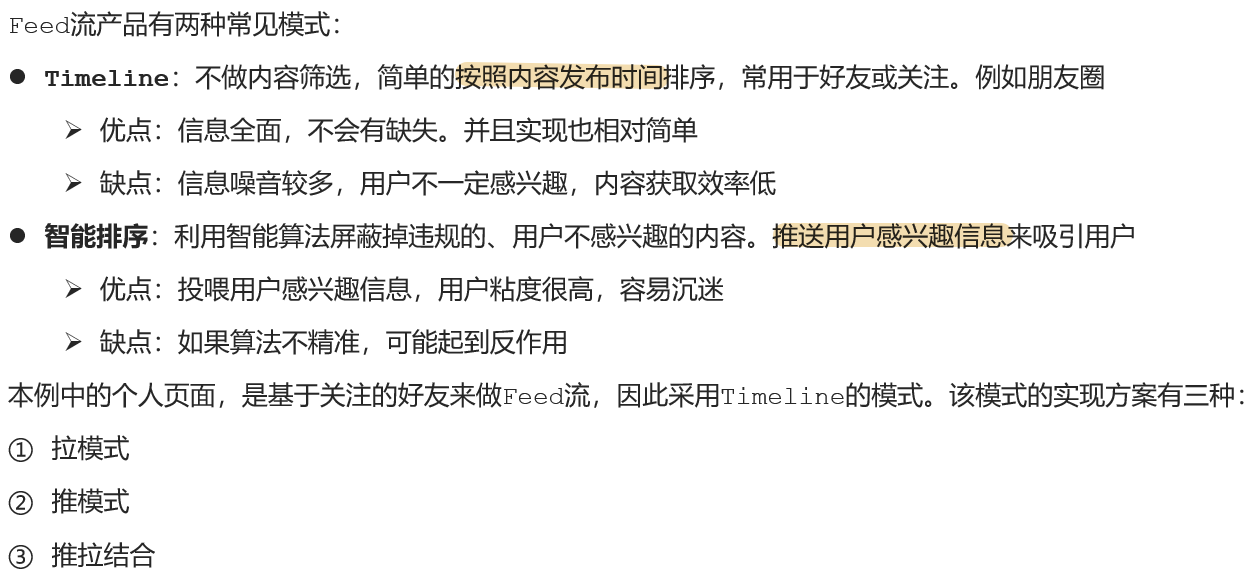
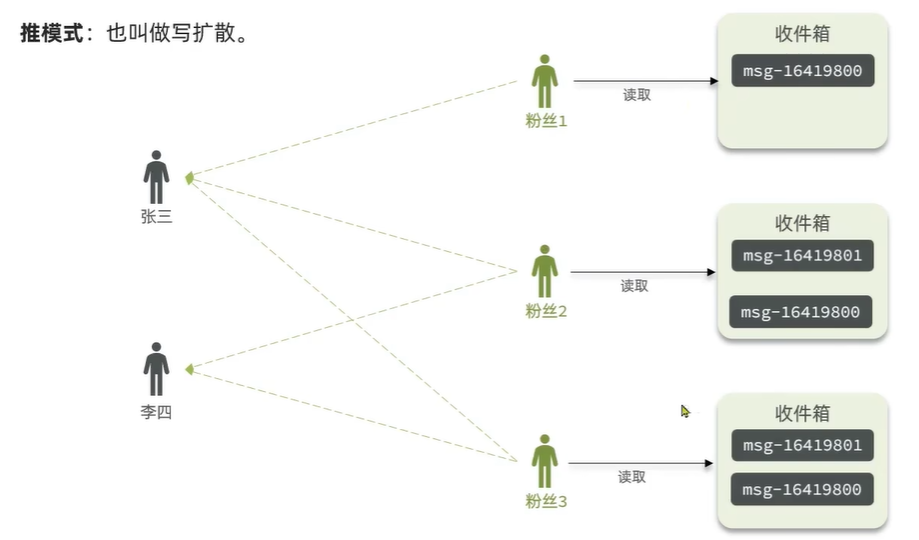
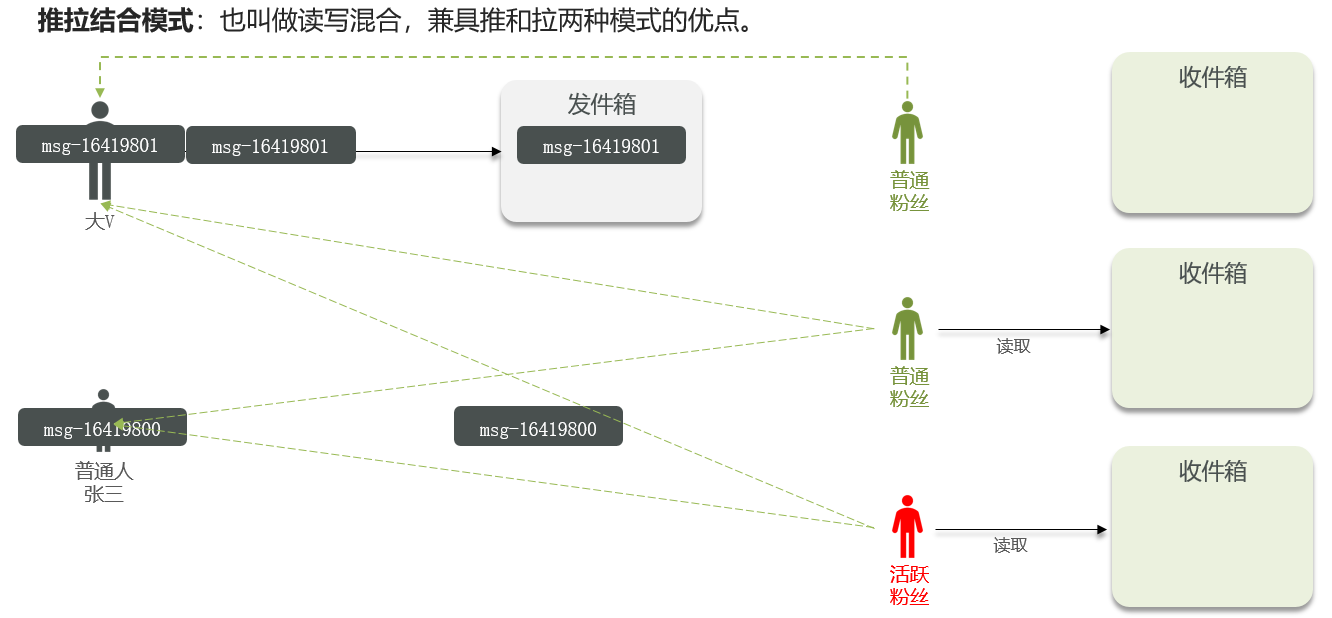
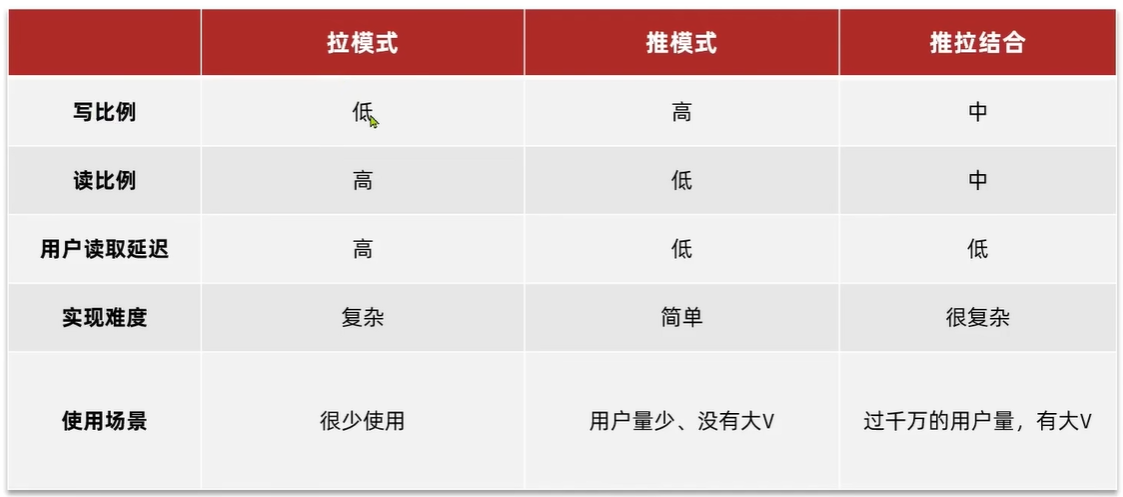
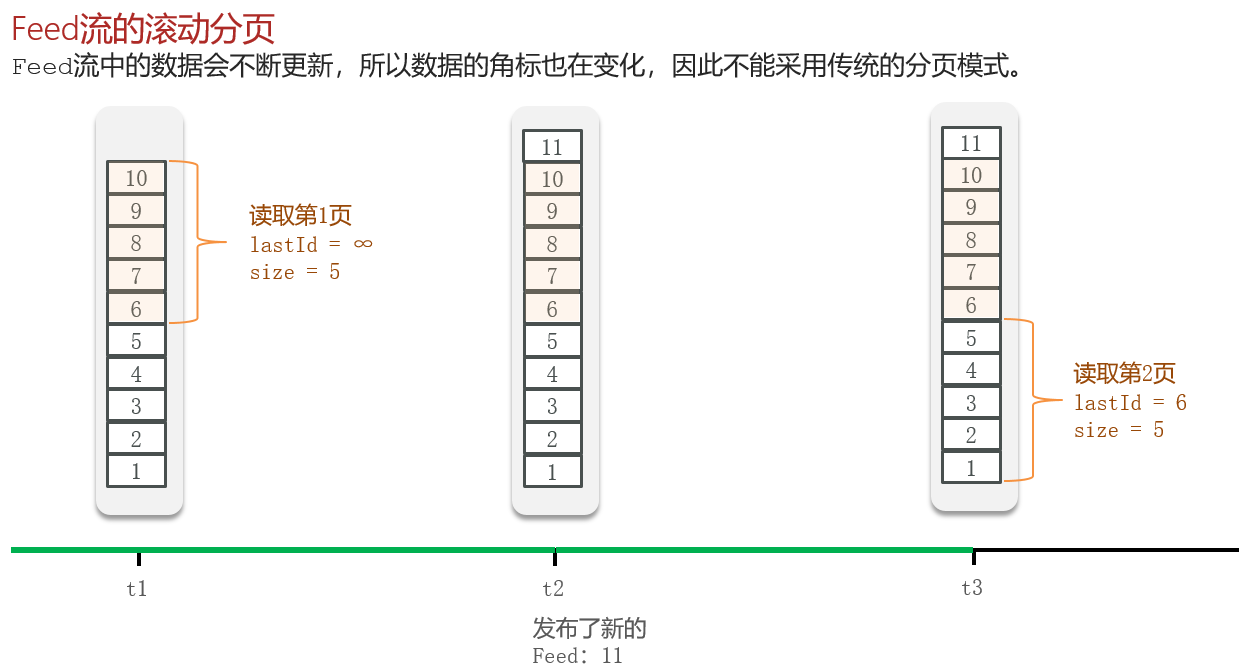
9.3 Feed流实现方案
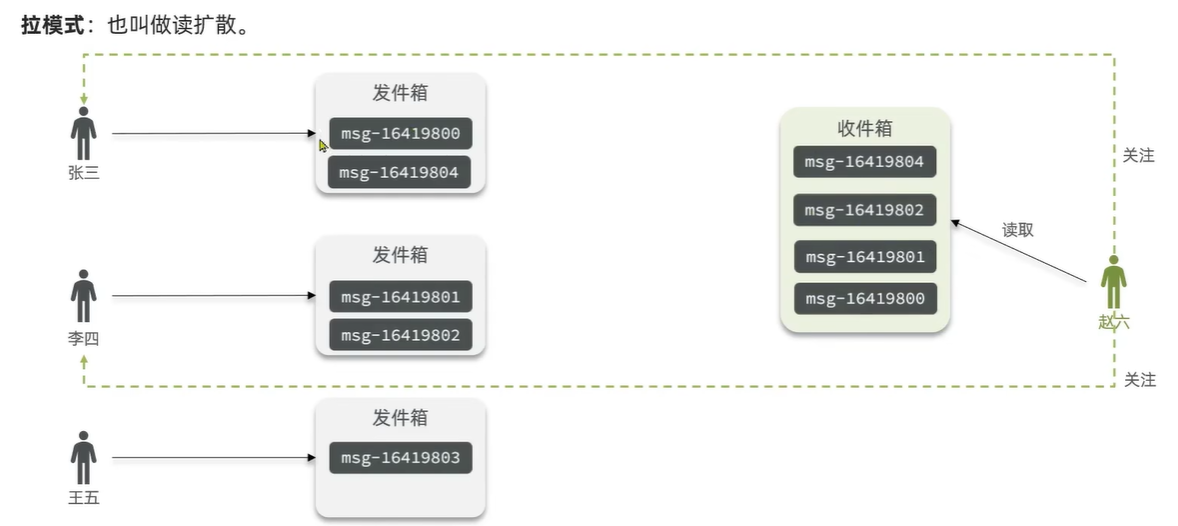
推拉模式是一个折中的方案,
站在发件人这一段:
如果是个普通的人,那么我们采用推模式的方式,直接把数据写入到他的粉丝中去,因为普通的人他的粉丝关注量比较小,所以这样做没有压力。
如果是大V,那么他是直接将数据先写入到一份到发件箱里边去,然后再直接写一份到活跃粉丝收件箱里边去。
现在站在收件人这端来看:
如果是活跃粉丝,那么大V和普通的人发的都会直接写入到自己收件箱里边来。
如果是普通的粉丝,由于他们上线不是很频繁,所以等他们上线时,再从发件箱里边去拉信息。
9.4 推送到粉丝收件箱
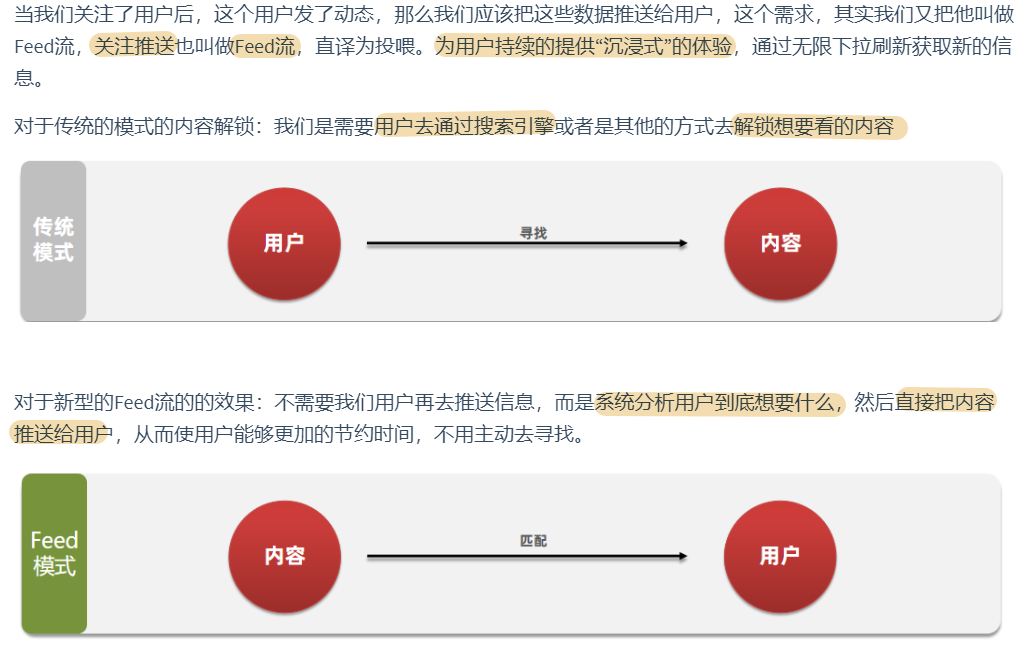
核心的意思:就是我们在保存完探店笔记后,获得到当前笔记的粉丝,然后把数据推送到粉丝的redis中去。
BlogController
1
2
3
4
@PostMapping public Result saveBlog (@RequestBody Blog blog) {return blogService.saveBlog(blog);
BlogServiceImpl
1
2
3
4
5
6
7
8
9
10
11
12
13
14
15
16
17
18
19
20
21
22
23
24
25
26
27
28
29
@Override public Result saveBlog (Blog blog) {UserDTO user = UserHolder.getUser();boolean isSuccess = save(blog);if (!isSuccess){return Result.fail("新增笔记失败!" );"follow_user_id" , user.getId()).list();for (Follow follow : follows) {Long userId = follow.getUserId();String key = FEED_KEY + userId;return Result.ok(blog.getId());
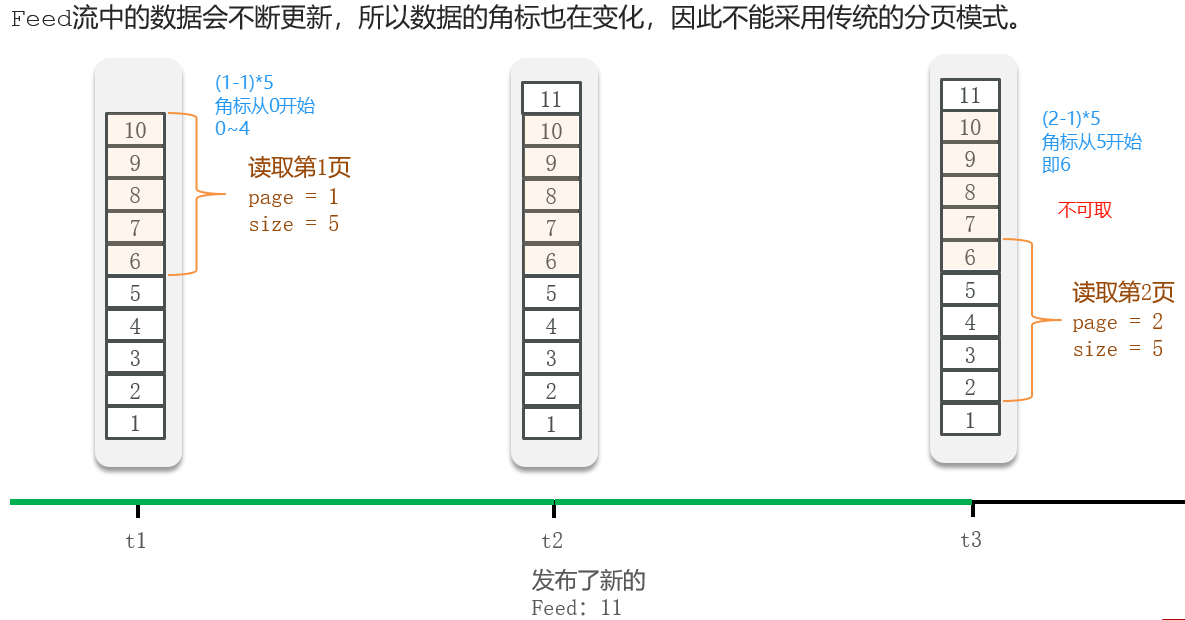
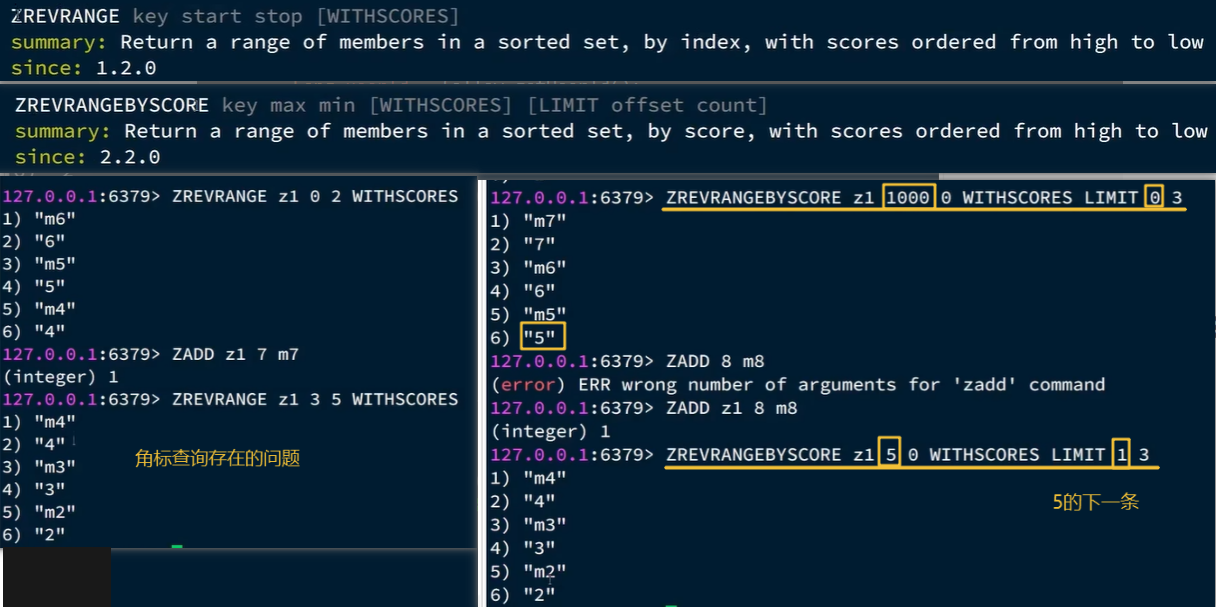
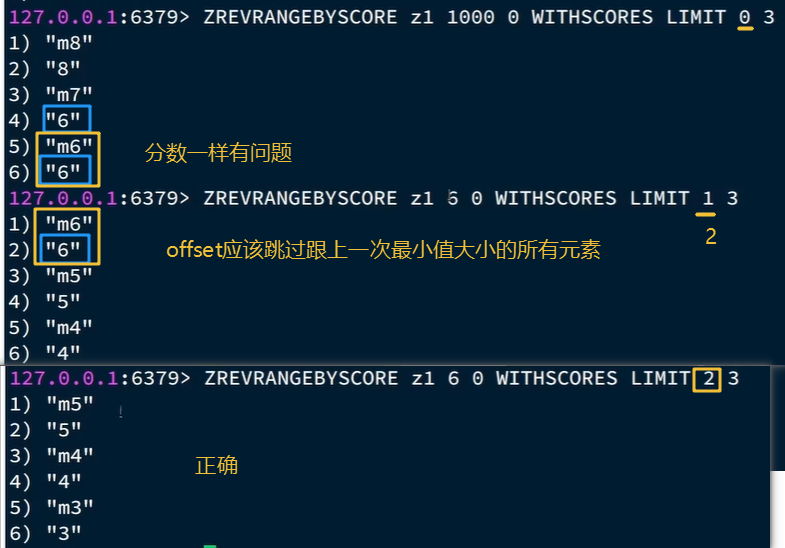
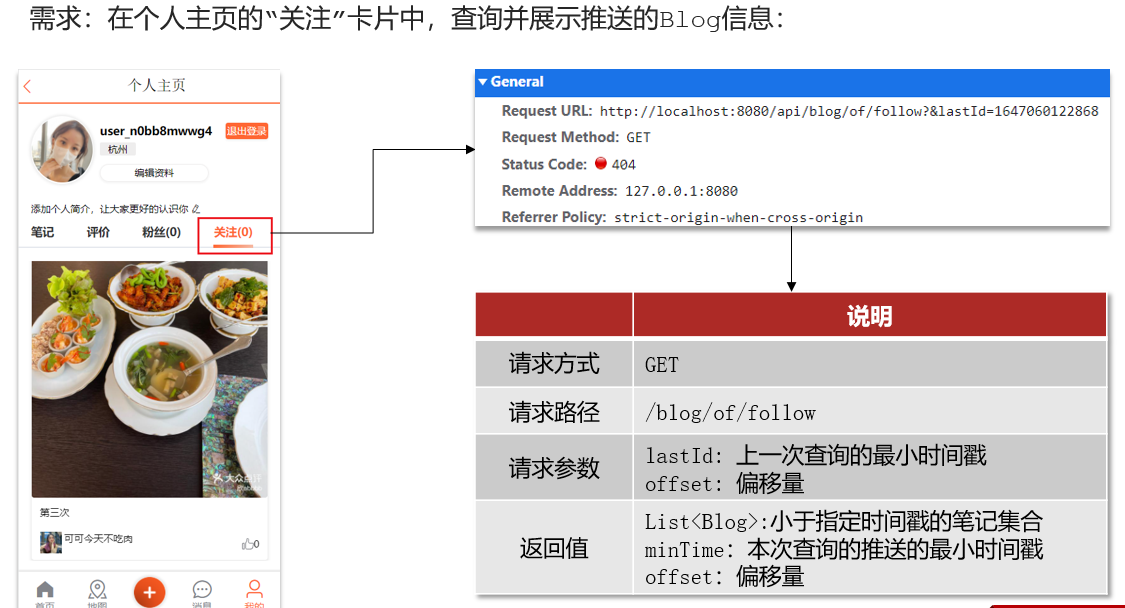
9.5 实现分页查询收邮箱
一、定义出来具体的返回值实体类
1
2
3
4
5
6
@Data public class ScrollResult {private List<?> list;private Long minTime;private Integer offset;
BlogController
注意:RequestParam 表示接受url地址栏传参的注解,当方法上参数的名称和url地址栏不相同时,可以通过RequestParam 来进行指定
1
2
3
4
5
@GetMapping("/of/follow") public Result queryBlogOfFollow ( @RequestParam("lastId") Long max, @RequestParam(value = "offset", defaultValue = "0") Integer offset) {return blogService.queryBlogOfFollow(max, offset);
BlogServiceImpl
1
2
3
4
5
6
7
8
9
10
11
12
13
14
15
16
17
18
19
20
21
22
23
24
25
26
27
28
29
30
31
32
33
34
35
36
37
38
39
40
41
42
43
44
45
46
47
48
49
50
51
52
53
54
55
56
57
58
59
60
@Override public Result queryBlogOfFollow (Long max, Integer offset) {Long userId = UserHolder.getUser().getId();String key = FEED_KEY + userId; 0 , max, offset, 2 ); if (typedTuples == null || typedTuples.isEmpty()) {return Result.ok();new ArrayList <>(typedTuples.size());long minTime = 0 ; int os = 1 ; for (ZSetOperations.TypedTuple<String> tuple : typedTuples) { long time = tuple.getScore().longValue();if (time == minTime){else {1 ;String idStr = StrUtil.join("," , ids);"id" , ids)"ORDER BY FIELD(id," + idStr + ")" ).list();for (Blog blog : blogs) {ScrollResult r = new ScrollResult ();return Result.ok(r);private void queryBlogUser (Blog blog) {Long userId = blog.getUserId();User user = userService.getById(userId);
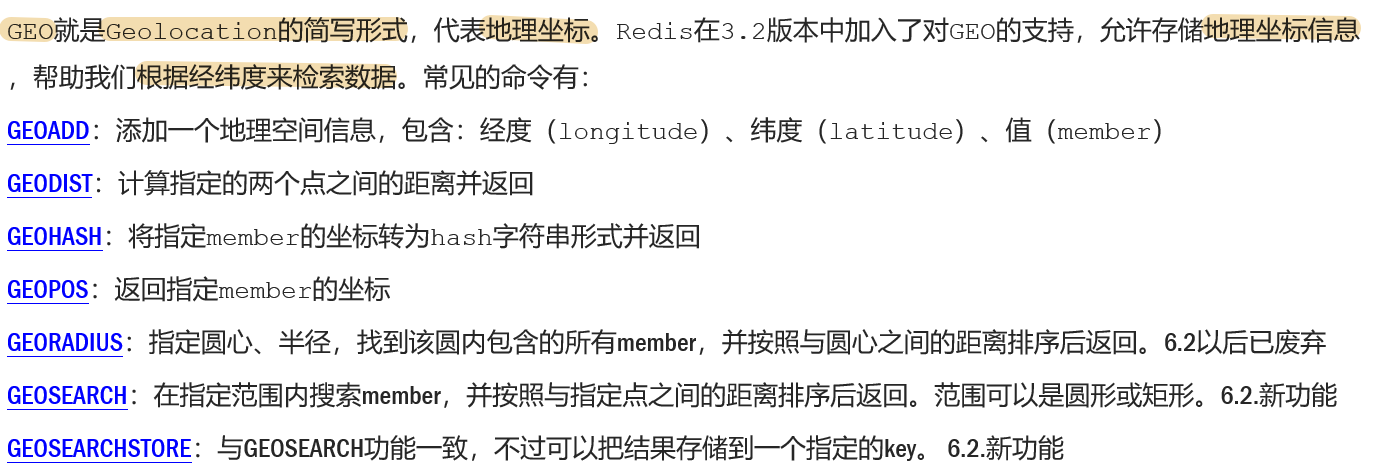
10. 附近商户 10.1 GEO数据结构的基本用法
10.2 导入店铺数据到GEO
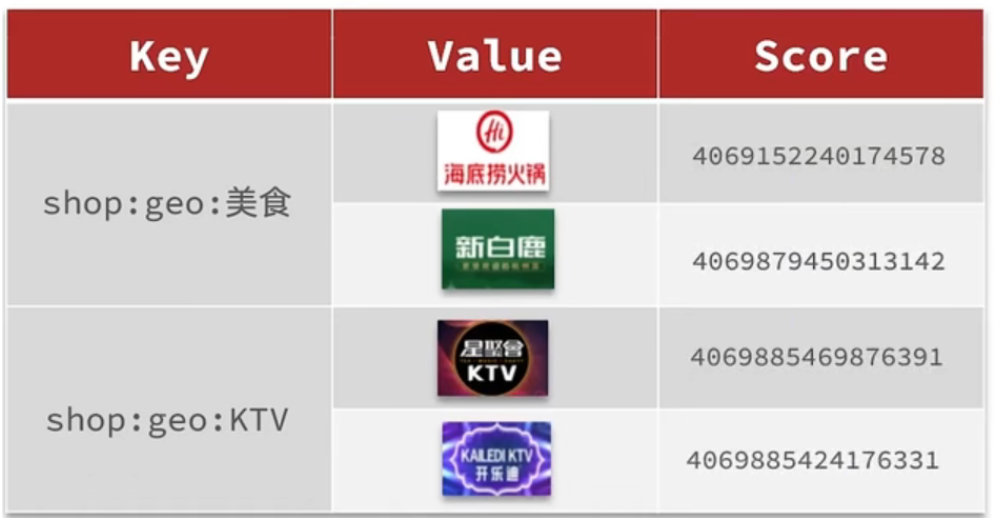
按照商户类型做分组,类型相同的商户作为同一组,以typeId为key存入同一个GEO集合中即可
将数据库表中的数据导入到redis中去,redis中的GEO,GEO在redis中就一个menber和一个经纬度,我们把x和y轴传入到redis做的经纬度位置去,但我们不能把所有的数据都放入到menber中去,毕竟作为redis是一个内存级数据库,如果存海量数据,redis还是力不从心,所以我们在这个地方存储他的id即可。
但是这个时候还有一个问题,就是在redis中并没有存储type,所以我们无法根据type来对数据进行筛选,所以我们可以按照商户类型做分组,类型相同的商户作为同一组,以typeId为key存入同一个GEO集合中即可
代码
HmDianPingApplicationTests
1
2
3
4
5
6
7
8
9
10
11
12
13
14
15
16
17
18
19
20
21
22
23
24
25
26
27
28
@Test void loadShopData () {for (Map.Entry<Long, List<Shop>> entry : map.entrySet()) {Long typeId = entry.getKey();String key = SHOP_GEO_KEY + typeId;new ArrayList <>(value.size());for (Shop shop : value) {new RedisGeoCommands .GeoLocation<>(new Point (shop.getX(), shop.getY())
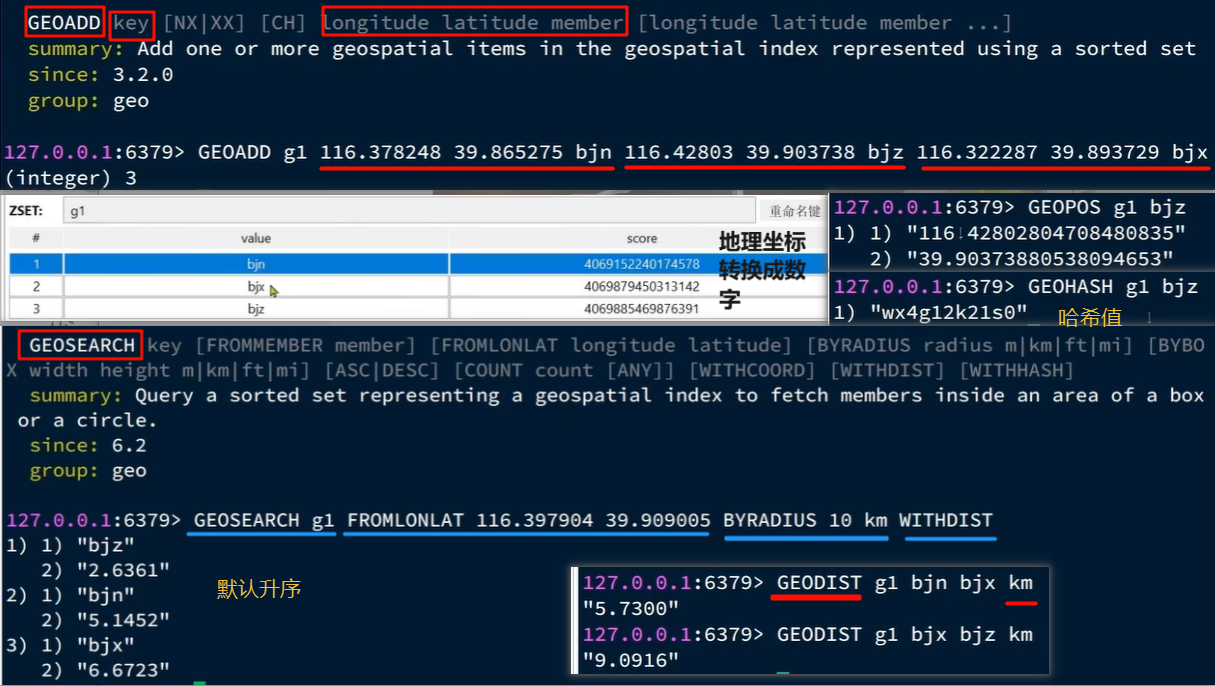
10.3 实现附近商户功能 SpringDataRedis的2.3.9版本并不支持Redis 6.2提供的GEOSEARCH命令,因此我们需要提示其版本,修改自己的POM
第一步:导入pom
1 2 3 4 5 6 7 8 9 10 11 12 13 14 15 16 17 18 19 20 21 22 23 24 25 26 <dependency > <groupId > org.springframework.boot</groupId > <artifactId > spring-boot-starter-data-redis</artifactId > <exclusions > <exclusion > <artifactId > spring-data-redis</artifactId > <groupId > org.springframework.data</groupId > </exclusion > <exclusion > <artifactId > lettuce-core</artifactId > <groupId > io.lettuce</groupId > </exclusion > </exclusions > </dependency > <dependency > <groupId > org.springframework.data</groupId > <artifactId > spring-data-redis</artifactId > <version > 2.6.2</version > </dependency > <dependency > <groupId > io.lettuce</groupId > <artifactId > lettuce-core</artifactId > <version > 6.1.6.RELEASE</version > </dependency >
第二步:
ShopController
1
2
3
4
5
6
7
8
9
@GetMapping("/of/type") public Result queryShopByType ( @RequestParam("typeId") Integer typeId, @RequestParam(value = "current", defaultValue = "1") Integer current, @RequestParam(value = "x", required = false) Double x, @RequestParam(value = "y", required = false) Double y ) {return shopService.queryShopByType(typeId, current, x, y);
ShopServiceImpl
1
2
3
4
5
6
7
8
9
10
11
12
13
14
15
16
17
18
19
20
21
22
23
24
25
26
27
28
29
30
31
32
33
34
35
36
37
38
39
40
41
42
43
44
45
46
47
48
49
50
51
52
53
54
55
56
57
58
@Override public Result queryShopByType (Integer typeId, Integer current, Double x, Double y) {if (x == null || y == null ) {"type_id" , typeId)new Page <>(current, SystemConstants.DEFAULT_PAGE_SIZE));return Result.ok(page.getRecords());int from = (current - 1 ) * SystemConstants.DEFAULT_PAGE_SIZE;int end = current * SystemConstants.DEFAULT_PAGE_SIZE;String key = SHOP_GEO_KEY + typeId;new Distance (5000 ),if (results == null ) {return Result.ok(Collections.emptyList());if (list.size() <= from) {return Result.ok(Collections.emptyList());new ArrayList <>(list.size());new HashMap <>(list.size());String shopIdStr = result.getContent().getName();Distance distance = result.getDistance();String idStr = StrUtil.join("," , ids);"id" , ids)"ORDER BY FIELD(id," + idStr + ")" ).list();for (Shop shop : shops) {return Result.ok(shops);
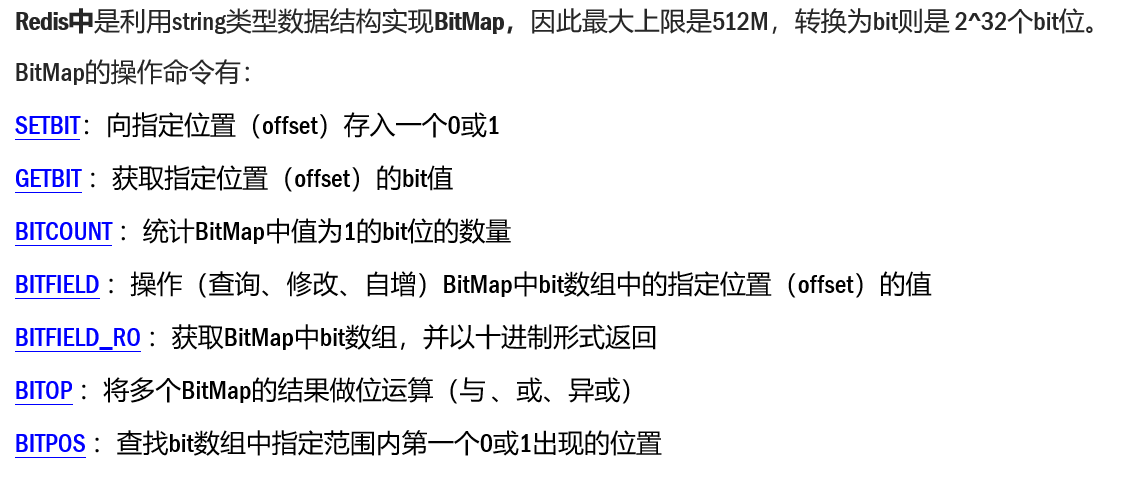
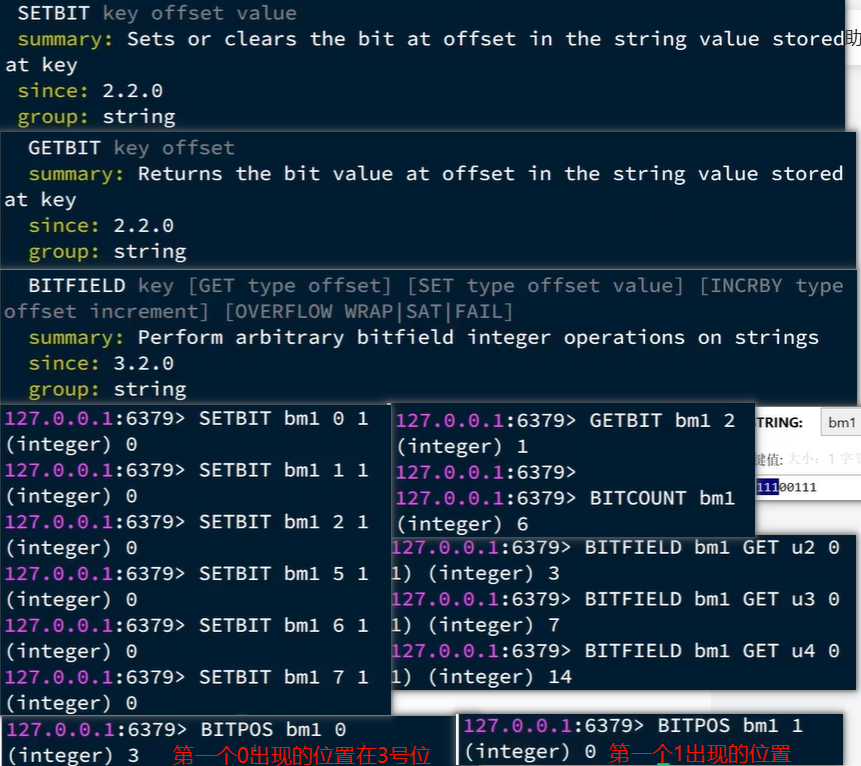
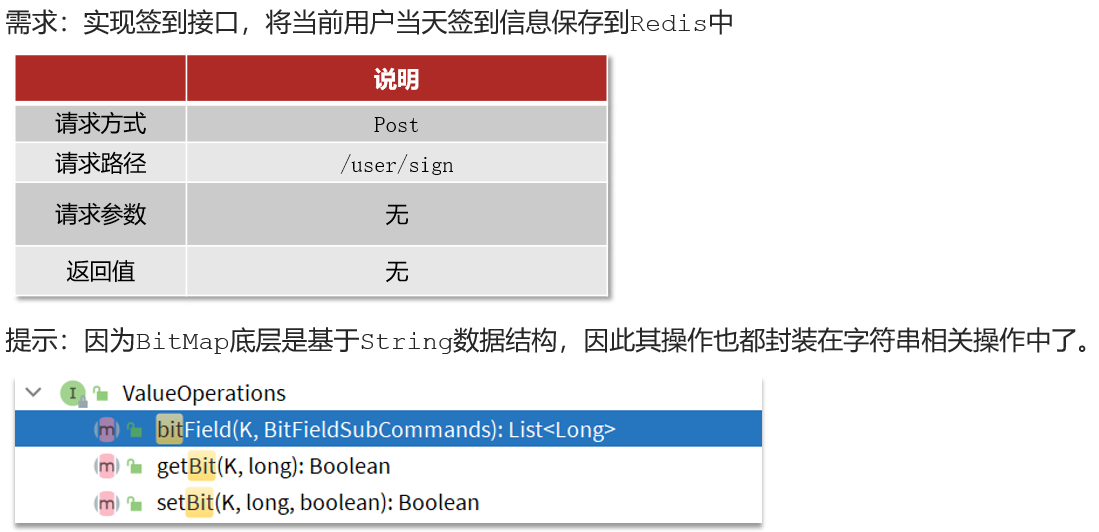
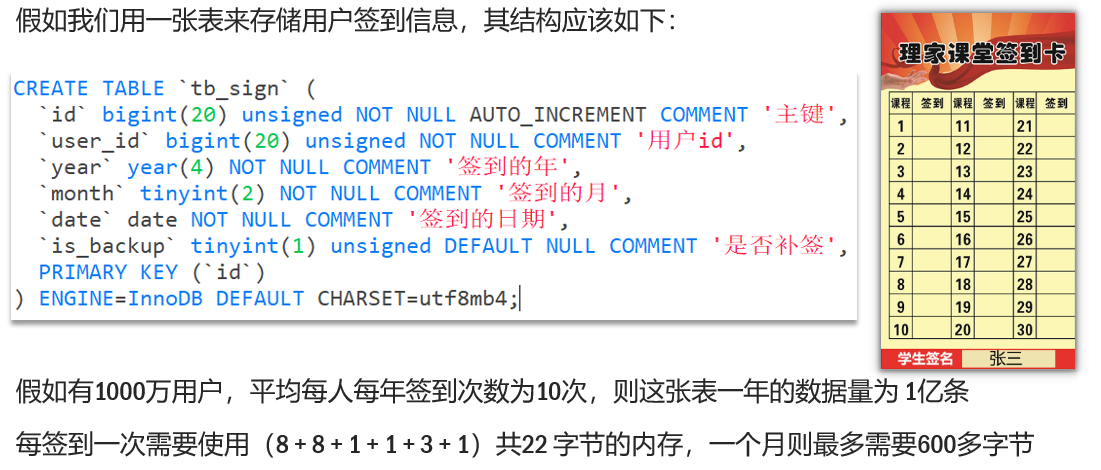
11. 用户签到 11.1 BitMap功能演示
11.2 实现签到功能
代码
UserController
1
2
3
4
@PostMapping("/sign") public Result sign () {return userService.sign();
UserServiceImpl
1
2
3
4
5
6
7
8
9
10
11
12
13
14
15
@Override public Result sign () {Long userId = UserHolder.getUser().getId();LocalDateTime now = LocalDateTime.now();String keySuffix = now.format(DateTimeFormatter.ofPattern(":yyyyMM" ));String key = USER_SIGN_KEY + userId + keySuffix;int dayOfMonth = now.getDayOfMonth(); 1 , true );return Result.ok();
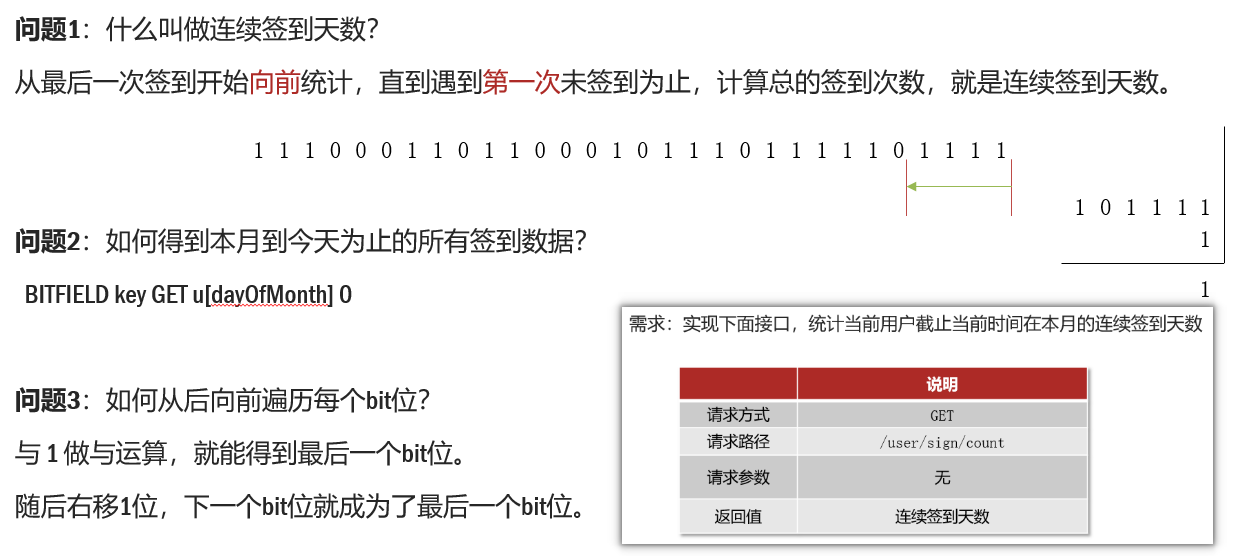
11.3 签到统计
代码
UserControlle
1
2
3
4
@GetMapping("/sign/count") public Result signCount () {return userService.signCount();
UserServiceImpl
1
2
3
4
5
6
7
8
9
10
11
12
13
14
15
16
17
18
19
20
21
22
23
24
25
26
27
28
29
30
31
32
33
34
35
36
37
38
39
40
41
42
43
44
45
@Override public Result signCount () {Long userId = UserHolder.getUser().getId();LocalDateTime now = LocalDateTime.now();String keySuffix = now.format(DateTimeFormatter.ofPattern(":yyyyMM" ));String key = USER_SIGN_KEY + userId + keySuffix;int dayOfMonth = now.getDayOfMonth();0 )if (result == null || result.isEmpty()) {return Result.ok(0 );Long num = result.get(0 );if (num == null || num == 0 ) {return Result.ok(0 );int count = 0 ;while (true ) {if ((num & 1 ) == 0 ) {break ;else {1 ;return Result.ok(count);
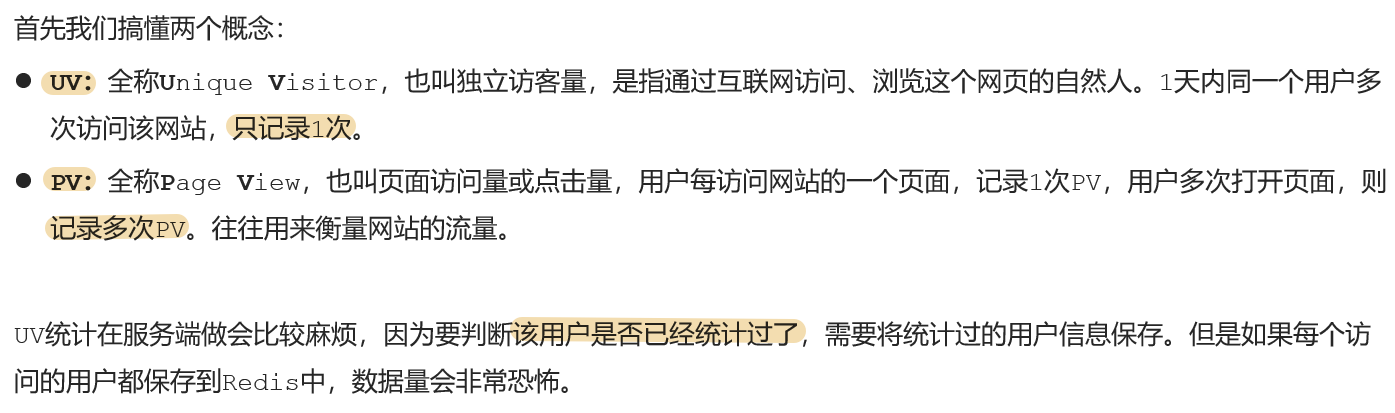
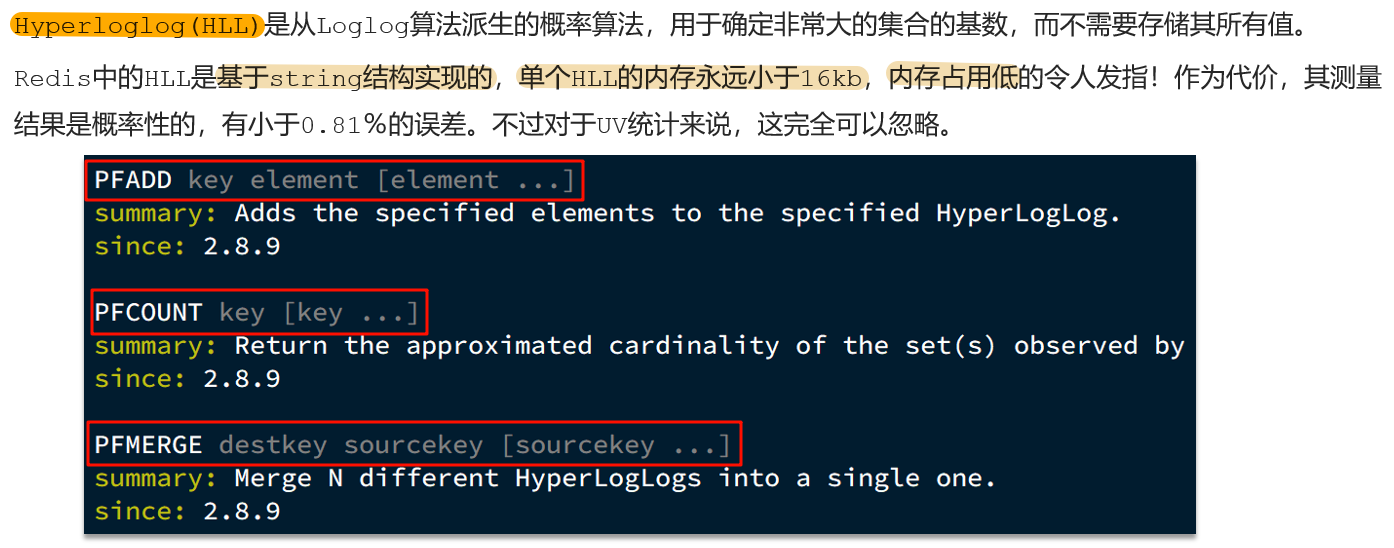
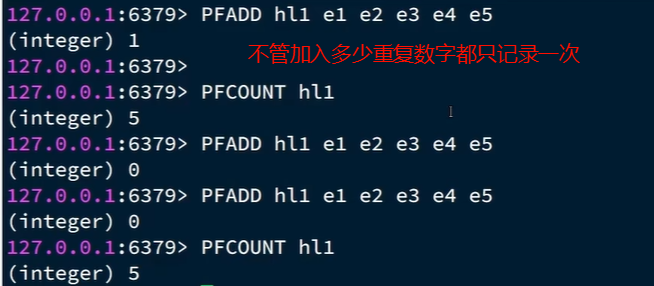
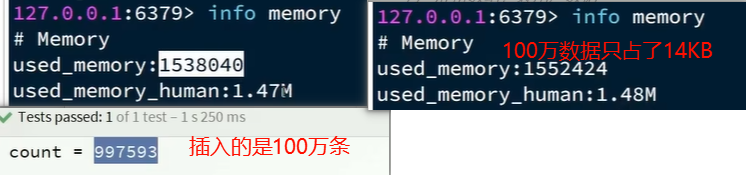
12. UV统计 12.1 HyperLogLog
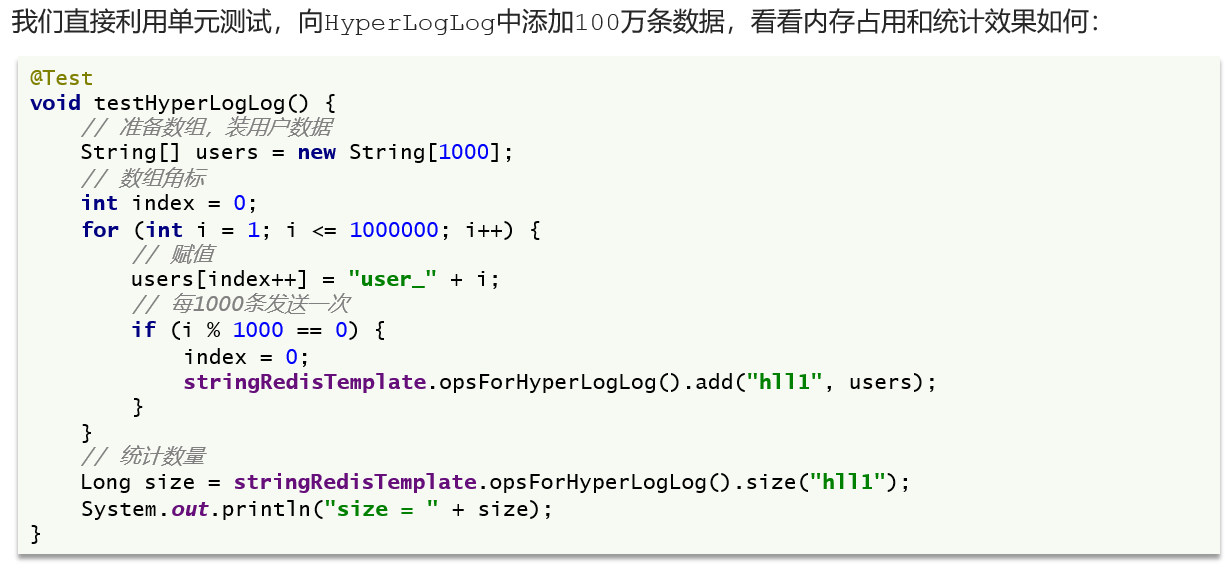
12.2 测试百万数据的统计
HyperLogLog的作用:做海量数据的统计工作
HyperLogLog的优点:内存占用极低;性能非常好
HyperLogLog的缺点:有一定的误差


 编辑
编辑